Whether you plan to do it yourself or hire a professional, it is worth knowing how a properly built block-paved surface comes together. A good result depends on keeping to the right order of work – and on patience.
1. Survey and planning

Everything starts with the site survey: setting out the surface, establishing the falls (water must run away from the building), and choosing the layer build-up and the paver. This is where the quality of the end result is decided – good planning is the foundation of a durable pavement.
2. Earthworks
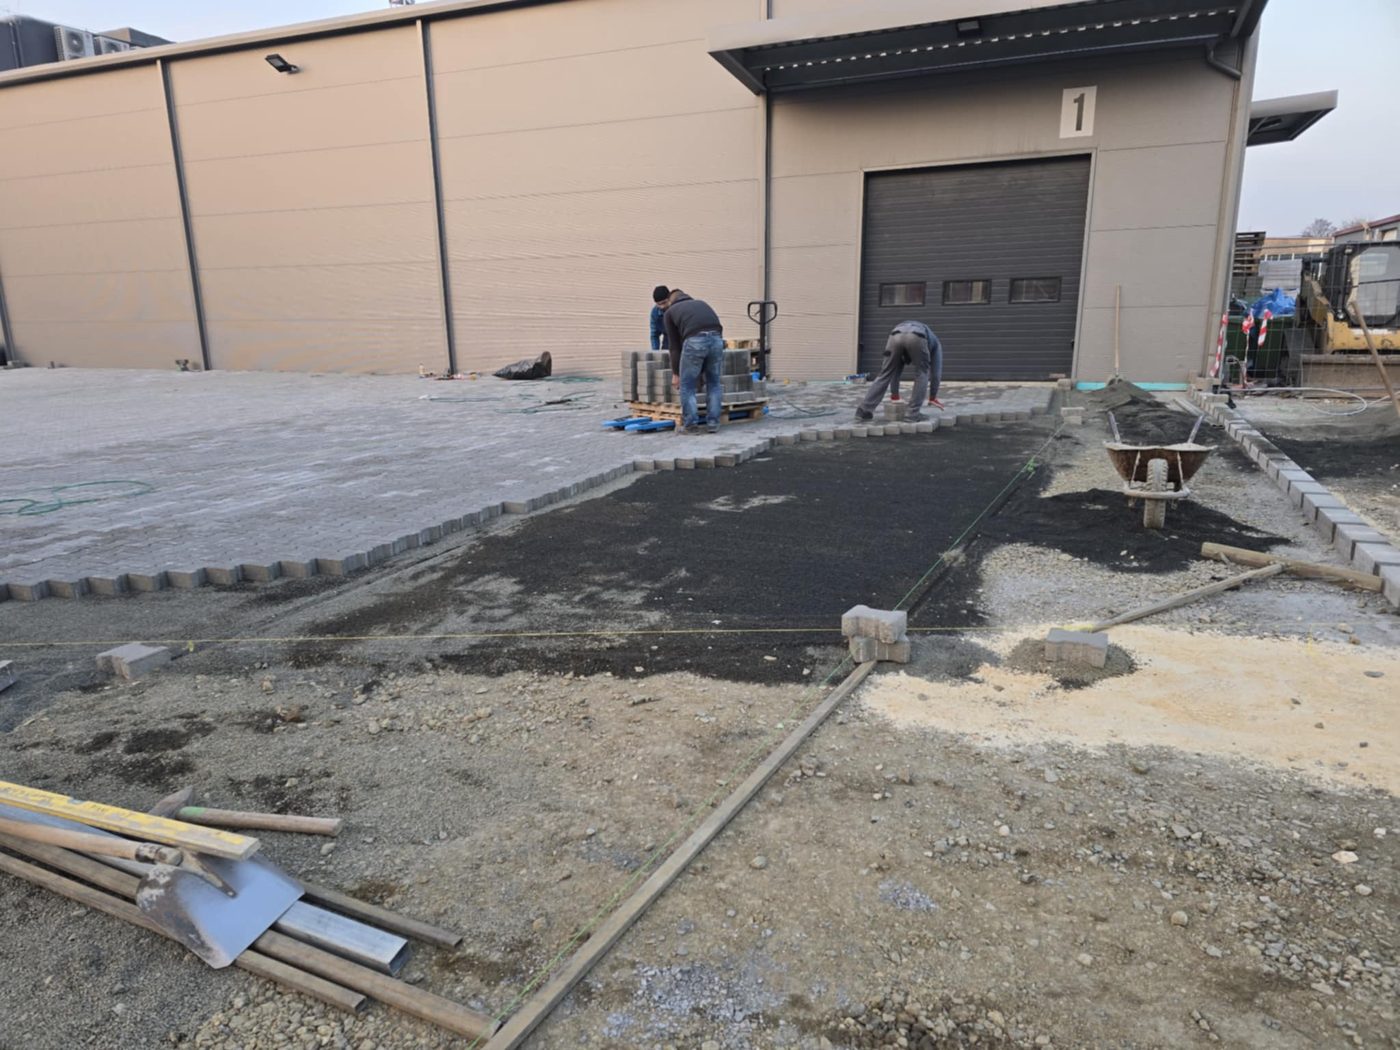
The organic topsoil is removed, typically to a depth of 30 cm, and the formation (the box) is shaped with the final falls. It is important that the excavated surface already slopes in the right direction.
3. The sub-base
Crushed stone (zahorra) is spread and compacted layer by layer. For heavy vehicle or industrial loading, a cement-treated base is added as reinforcement. Compaction is not optional – the lifespan of the pavement stands or falls on it.
4. The kerbs
The kerbs go into a concrete bed with a concrete haunch. They hold the edge of the pavement together and stop the blocks creeping outwards. The kerb is part of the load-bearing structure, not mere decoration.
5. The bedding layer
About 4 cm of fine grit (2/5 mm), carefully screeded flat. From this point no one may step on it – footprints would deform the surface before the blocks are laid.
6. Laying the blocks
The blocks are laid with 3–5 mm joints, in the chosen pattern. A professional layer works from several pallets at once, mixing, so that small batch-to-batch colour differences spread out evenly instead of showing up in patches.
7. Compaction and jointing
A rubber-matted plate compactor beds the blocks in; then the joints are filled with fine sand, brushed in, and the surface compacted again. In the first weeks the jointing sand may need topping up as it settles.
Hasty work is rarely good work – in paving, every layer is the foundation of the next.
How long does the whole thing take?
The duration depends on the size of the surface and the layer build-up. An average driveway takes a few working days; a larger yard, one to two weeks. Curing time for the cement-treated base and settlement count too. Rushing is the most common source of defects – patience pays for itself here.
Preparation: materials, machines, time
A successful paving job begins with good preparation. The exact area and material quantities must be measured (crushed stone, cement-treated base, bedding, pavers, kerbs), the blocks sourced from a single production batch where possible, and the machinery arranged (a mini-excavator for the earthworks, a compactor, a vibrating plate, a block cutter). The weather matters too: concrete and cement-treated base work is best kept out of the hottest summer hours, and persistent rain makes earthworks difficult.
Setting out the falls – the invisible key step
One of the most important yet least glamorous steps is setting out the falls. The surface must drop 1.5–2 cm per metre, away from the building and towards a drainage point. This is set out with string lines and a level before the earthworks begin, and every subsequent layer follows that gradient. If the falls are wrong, water will pond on the finished surface – a serious matter given the torrential rains our region sees – and the only cure afterwards is taking it apart.
The kerb: the frame that holds it together
The kerbs are built before laying begins, in a concrete bed with a concrete haunch. They form the frame of the pavement and stop the blocks sliding sideways under load. The kerb height is set to the finished paving level. Without kerbs, even the finest laying spreads apart within a few years – which is why the kerb is not an option but part of the structure.
Laying patterns
Blocks can be laid in several patterns: stack bond (simple, fast), stretcher bond (offset courses, more stable), herringbone (the best load capacity – ideal for trafficked surfaces), or mixed-size (modern, lively). The pattern is not just aesthetics: herringbone and stretcher bond distribute loads better. The layer works from several pallets, mixing, so colour shades spread evenly.
Finishing and the first weeks
After laying, the blocks are bedded in with the rubber-matted plate compactor, then the joints are filled with fine sand, brushed and compacted again. In the first weeks, as the jointing sand settles, it is worth topping up. The surface can be used straight away, but full consolidation takes a few weeks. Avoid the pressure washer early on – it can strip the fresh joints.
A common question: can I do it myself?
A small pedestrian surface (a garden path, a patio of a few square metres) can be built by a capable DIYer who respects the sequence and the compaction. Larger surfaces carrying vehicles or industrial traffic, however, demand machinery, experience and precise design – there, mistakes are costly and hard to put right. The most common amateur errors are neglected compaction and wrong falls, which lead to settlement within a few years.
Calculating the materials
Before laying, the quantities must be worked out precisely: the pavers from the area with a 5–10 % cutting allowance, the crushed stone and bedding from layer thickness times area, the kerbs and drainage channels from the perimeter. An accurate calculation avoids both shortages (which stop the job) and needless over-ordering. Our calculator helps with this too.
Weather and the build
Blocks are best laid in dry weather, but the critical point is the concrete work: the cement-treated base and the kerb bed need proper curing conditions – in the Málaga summer heat that means watching curing times and protecting fresh concrete from drying out, while persistent rain hampers the earthworks. Only in the inland comarcas (Ronda, Antequera) does the occasional light overnight frost need to be considered in midwinter. A good contractor schedules around the weather so every layer is built in the right conditions.
Handover and the first period
The finished surface is handed over compacted, jointed and on its falls. In the first weeks, as the jointing sand settles and everything consolidates, a few small touch-ups (sand top-ups) may still be needed. That is normal and part of the process. If you want certainty, we carry out the entire process turnkey: +34 613 656 443.
Timeline: a typical driveway
The typical sequence for a 20 m² driveway: day 1, earthworks and forming the box; day 2, spreading and compacting the crushed stone, plus cement-treated base if needed; after the base has cured, the kerbs; then bedding and block laying; finally compaction and jointing. The whole process, curing times included, usually takes a few working days. Rushing – for example not waiting for the cement-treated base to cure – is the most common quality defect.
A checklist during the build
Excavation to the right depth; crushed stone compacted in layers; correct falls away from the building; kerbs set in a concrete bed with a haunch; a cleanly screeded bedding layer; 3–5 mm joints; laying mixed from several pallets; final plate compaction and jointing. If every point on this list is met, the pavement will last – it is a good check for your own work or for work you commission.
Myth: "paving is a quick job"
The reality: good paving is a many-step process that demands patience. Layer-by-layer compaction, waiting out curing times and careful jointing all take time. Anyone who "throws down" a large surface in a single day is almost certainly skipping steps – and within a few years the result will show the price of the haste.
Summary
- The steps: survey/falls, earthworks, sub-base, kerbs, bedding, laying, compaction/jointing.
- The falls are set at the formation stage; they are hard to correct later.
- The 3–5 mm joint is needed for thermal movement and load distribution.
- A professional lays from several pallets, mixed, to avoid colour patching.
- Rushing is the most common source of error; curing times must be respected.
Key terms
Joint gap: the 3–5 mm gap between blocks that handles expansion and load transfer; butting blocks tight chips their edges.
Vibrating plate: a rubber-matted compacting machine used to bed the blocks in and finish the jointing.
Frequently asked questions
What are the main steps of laying block paving?
Survey and fall design, earthworks, a compacted sub-base, kerbing, the bedding layer, block laying, and finally compaction and jointing.
Why must a joint gap be left?
The 3–5 mm gap is needed for thermal movement and load distribution; tight butting leads to chipped block edges.
How long does laying block paving take?
It depends on the size: a driveway takes a few days, a larger yard one to two weeks, curing and consolidation time included.
Want a properly built paved surface in the province of Málaga, from survey to jointing? Call us on +34 613 656 443, write to oficina@adoquin.eu, or estimate your project with the calculator.
Planning a paving project?
Request a free site survey: we measure, advise, and within 1–2 working days you receive a detailed written quote.